¶ Initial Setup Walkthrough
This walkthrough describes the chronological steps I took to build the home lab. Each entry includes context, goals, prerequisites, the commands I ran, any obstacles encountered, and lessons learned.
¶ Table of Contents
- Network Design Draft
- Proxmox Installation
- Image Management
- VM Creation and Initial Configuration
- SPICE Setup for Desktops
- Network Design Rework
- OPNsense Installation
- Reconfigure Proxmox and pfSense
- OPNsense initial configuration
- Network Design Update
- pfSense general config
- Finish
- Lessons Learned
¶ 1. Network Design Draft
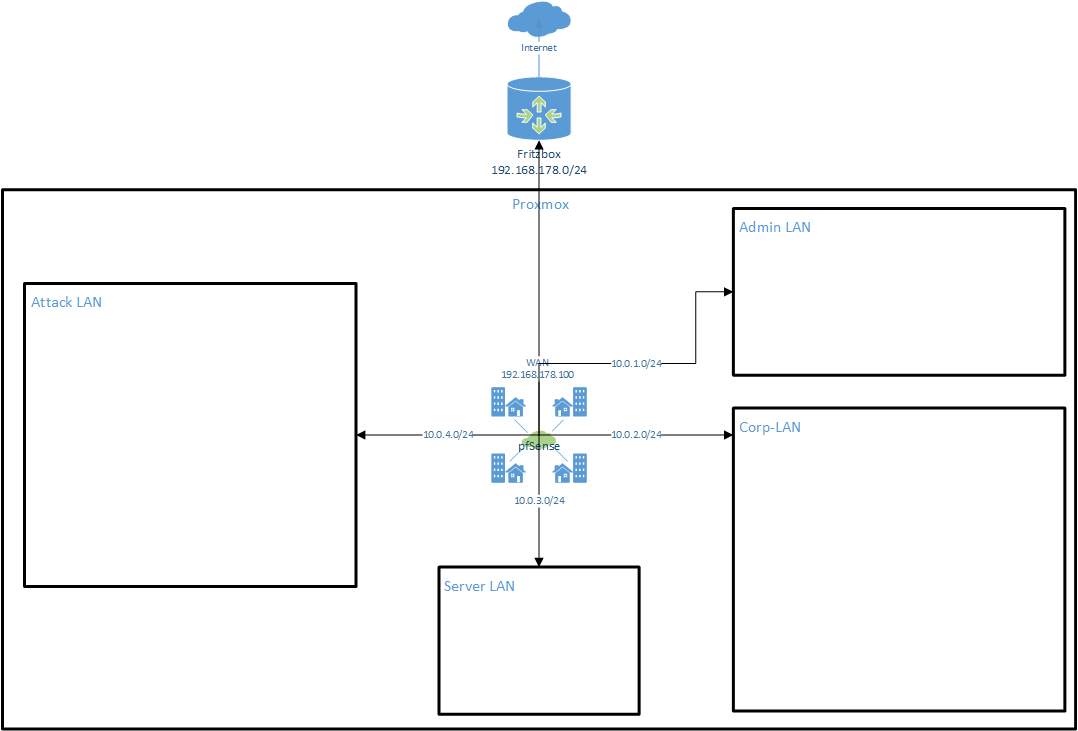
My very first step was to sketch an initial idea in Visio. I wanted to simulate an SOC-style lab where I can separate attacker networks from internal corporate networks, and everything routes out through my Fritz Box (192.168.178.1/24) into the Internet.
The idea was simple: pfSense sits in the middle as the central firewall/router, connected to the Fritz Box for WAN access, and provides separate LAN segments for different purposes (Admin, Corp, Server, Attack). At this point I didn’t think about VLANs or a DMZ yet, I just wanted the basic idea of “multiple LANs behind pfSense” working. The focus was on getting started, not being perfect.
I kept it simple at this point:
- pfSense as core router & firewall
- Attack LAN for pentesting/red-team experiments
- Corp LAN for internal “business-style” services
- Server LAN for backend servers
- Admin LAN for management
I documented this as Iteration 1 so I could later refine it without losing the history.
More details here: Network Design – Iteration 1
¶ 2. Proxmox Installation
For the hypervisor I decided to go with Proxmox VE on a small used PC. The idea was to keep it inexpensive, power-efficient, but still strong enough to handle multiple VMs for my SOC lab.
I chose an HP ProDesk 400 G3 Mini PC with an Intel Core i5-7500T and 16 GB RAM. It’s not high-end, but sufficient for running several light to medium-weight VMs, which is exactly what I needed.
I downloaded the latest Proxmox ISO and used Rufus to create a bootable USB stick. After booting from it, I ran through the installation wizard. I kept most of the defaults:
- formatted the entire disk,
- installed Proxmox with the graphical installer,
- assigned all memory to the system,
- set an root password,
- and configured a static IP from my home network so I could always reach the management interface.
I also set the hostname to proxmox01, to keep a clear naming convention from the very beginning. This avoids confusion later when multiple nodes or hosts might come into play.
Once the installation was finished, I connected to the Proxmox web interface from my browser via:
https://192.168.178.200:8006
Everything worked fine on first boot, so I had my hypervisor ready to go as the foundation for the lab.
¶ 3. Image Management
With Proxmox running, my next step was to prepare the installation media for the virtual machines I planned to use. I wanted to set up both Windows and Linux systems, plus pfSense as the central firewall.
I downloaded the following ISOs from the official sources and uploaded them into Proxmox local storage under ISO Images:
- Windows 10 Enterprise Evaluation
- Windows Server 2022 Evaluation
- Ubuntu Desktop 24.04.2
- Ubuntu Server 24.04.2
- Kali Linux 2025.1c (standard and Purple editions)
- VirtIO driver ISO (for Windows VMs)
- pfSense
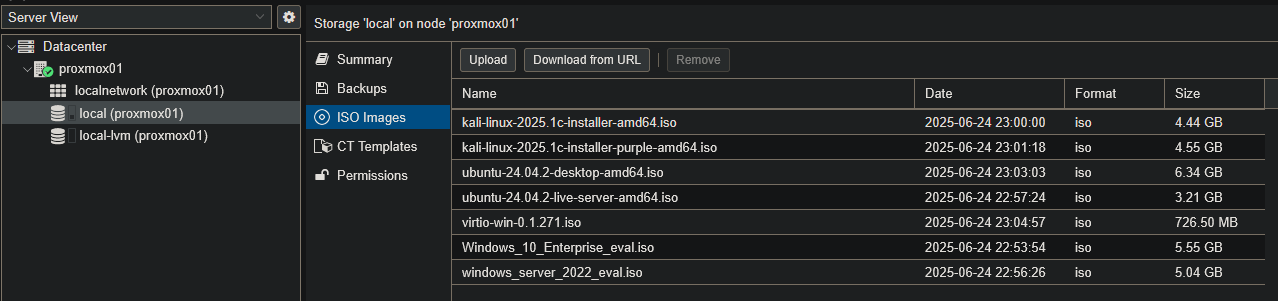
This gave me a ready-to-use collection of installation images directly inside Proxmox. That way I could create and install new VMs quickly, without having to re-download ISOs or search for them each time.
¶ 4. VM Creation and Initial Configuration
After uploading the ISOs, I started creating the first virtual machines in Proxmox. My goal was to have a basic set of systems up and running: Windows clients, a Windows server, some Linux machines, and pfSense as the firewall.
¶ Windows 10
As my first test system I set up a Windows 10 client.
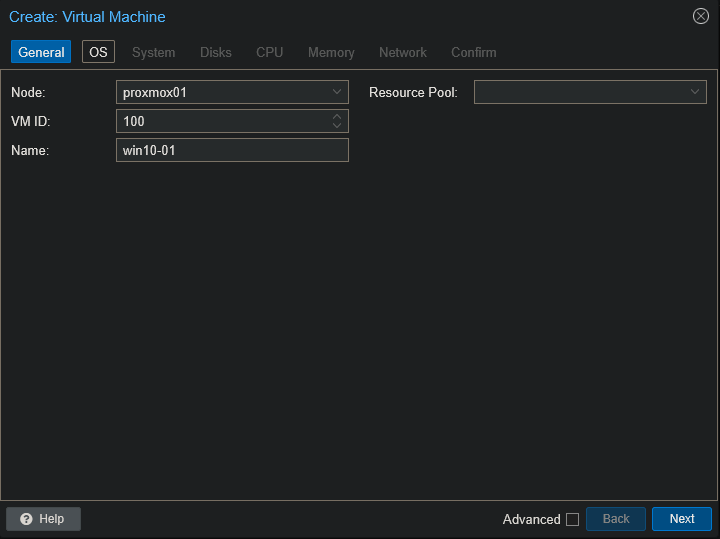
In the Proxmox web interface, I selected my node proxmox01 and clicked Create VM:

I named the VM win10-01:
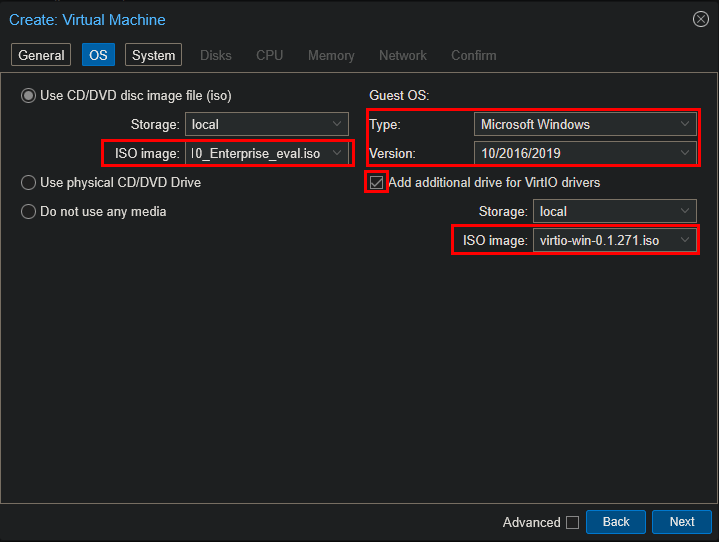
For the OS, I selected the Windows 10 Enterprise Evaluation ISO and added the VirtIO drivers ISO (important for performance and for proper network/disk drivers):
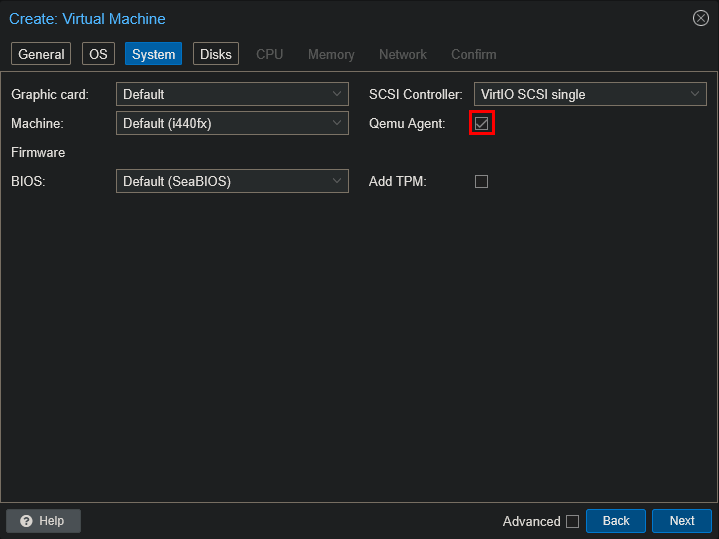
To improve integration with Proxmox, I enabled the Qemu Agent:
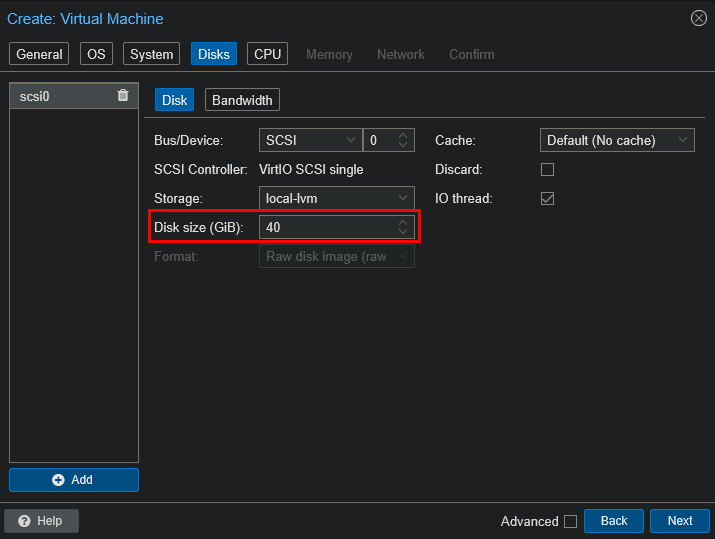
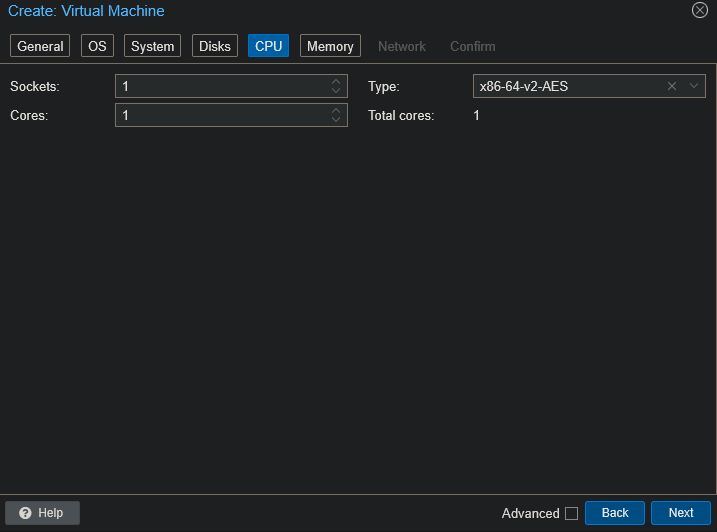
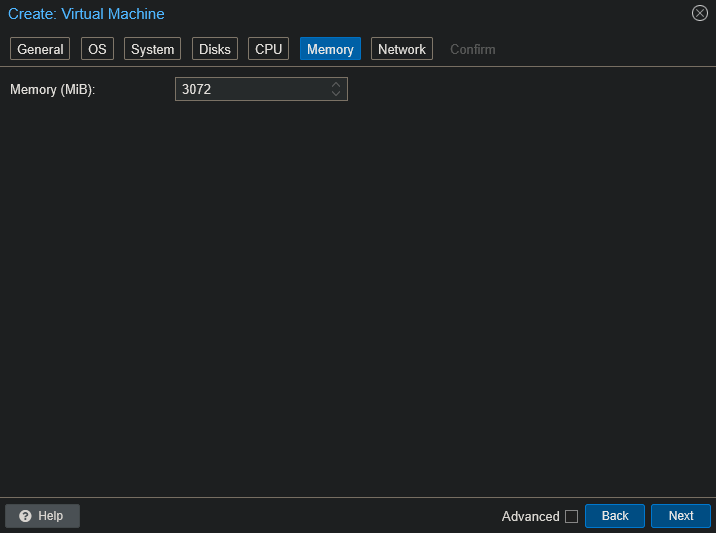
Next, I assigned Disk, CPU and RAM resources>
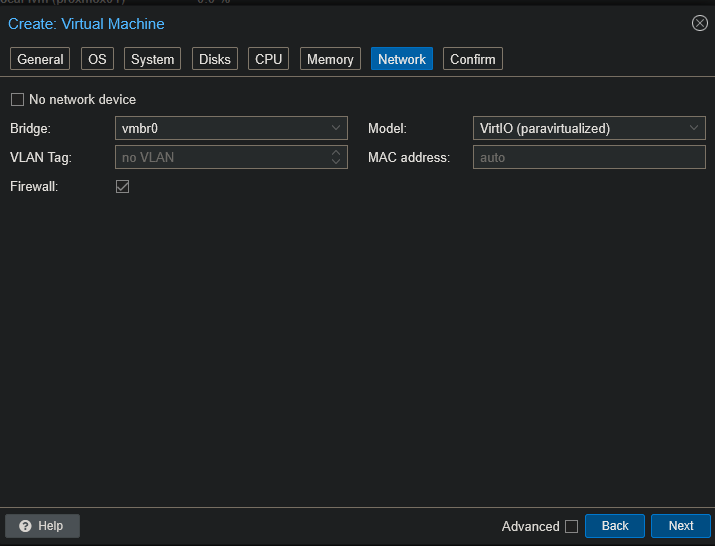
For the network I left the defaults, since I planned to adjust the NIC and bridge assignments later once my network design stabilized:
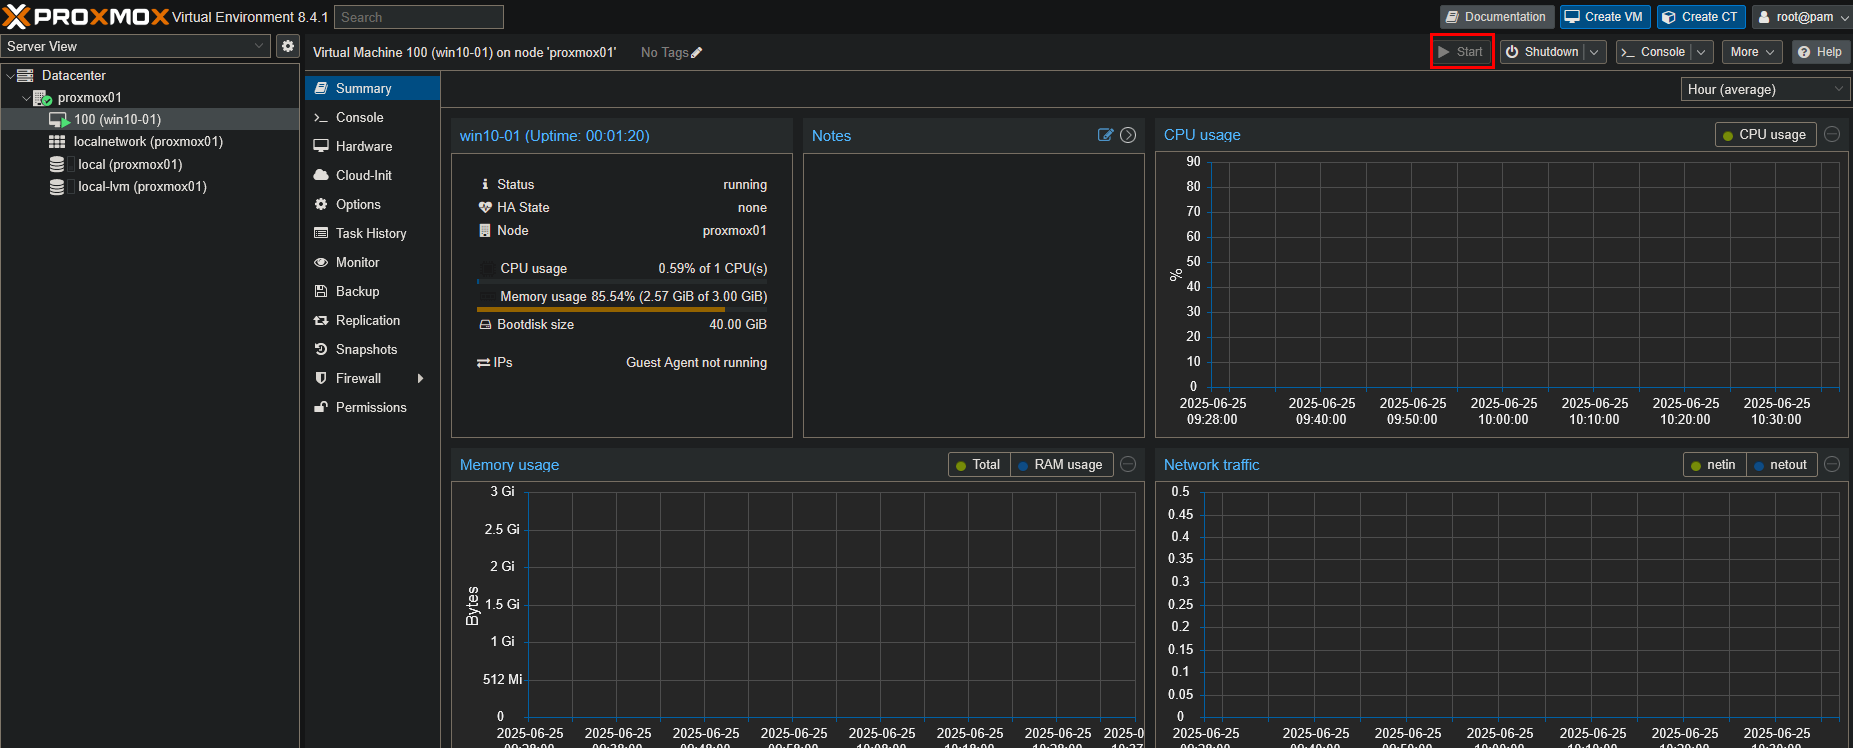
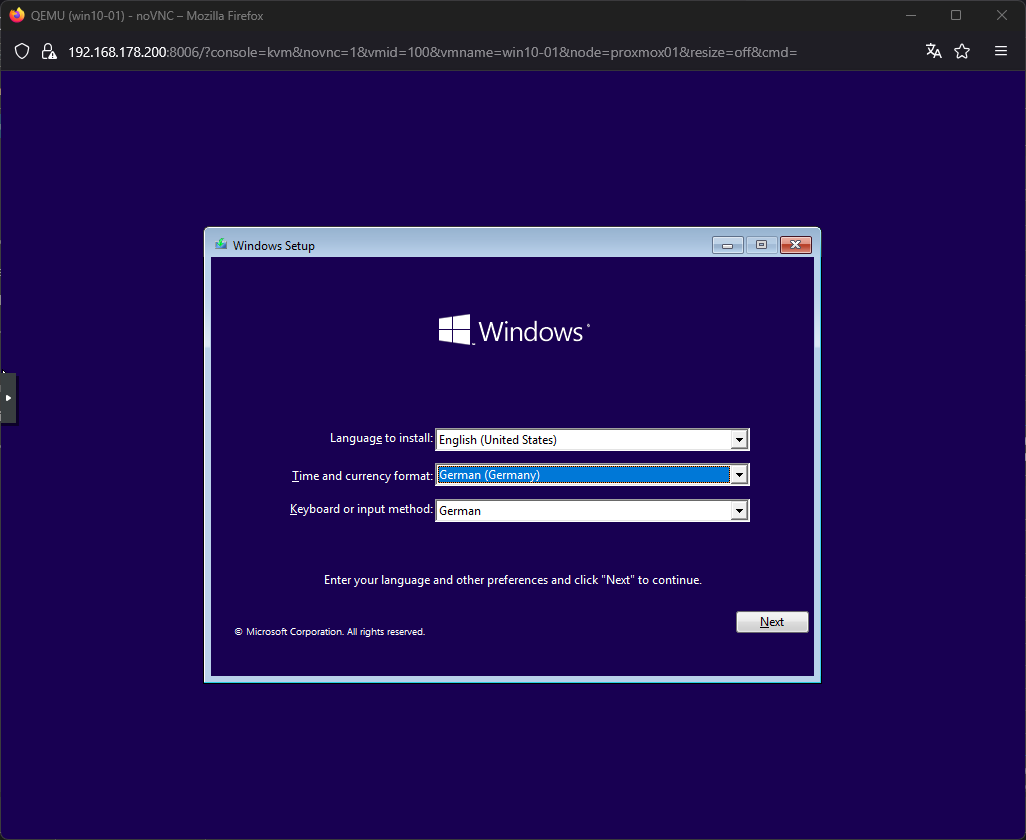
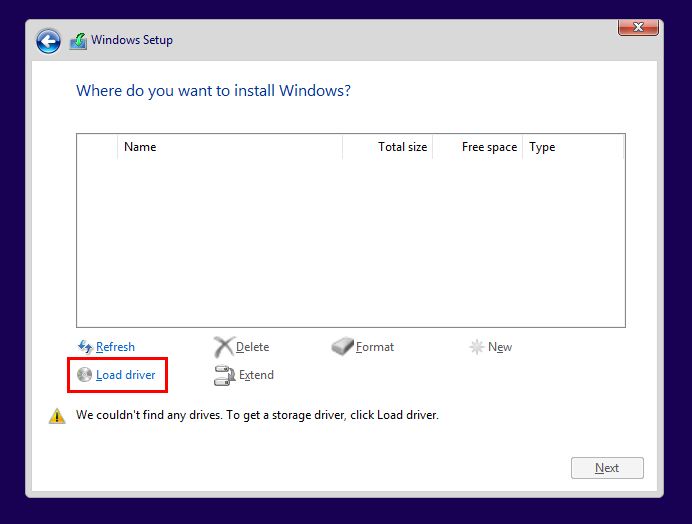
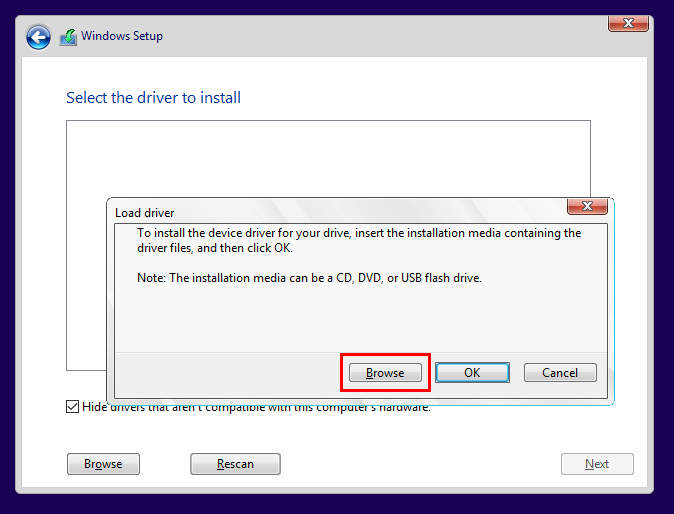
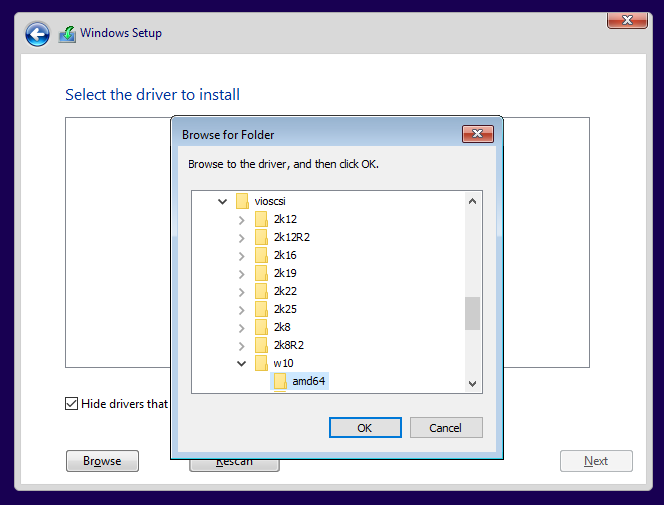
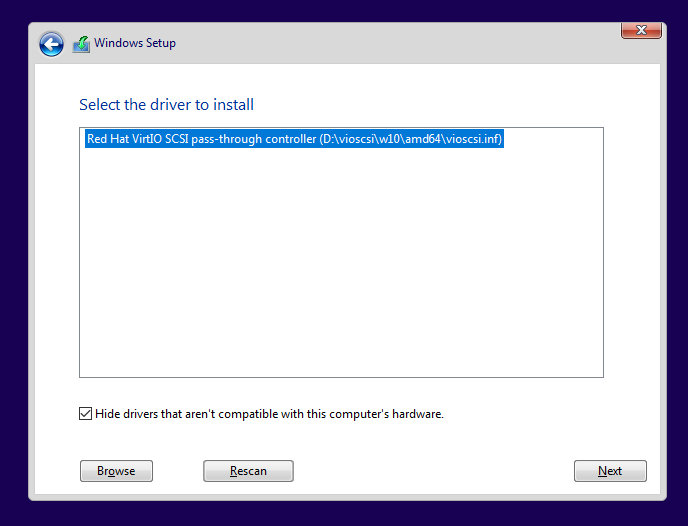
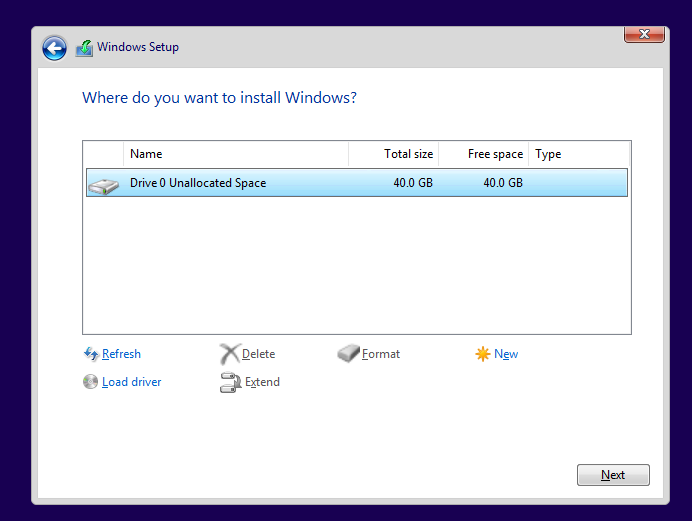
After completing the wizard, I booted the VM and went through the Windows setup:

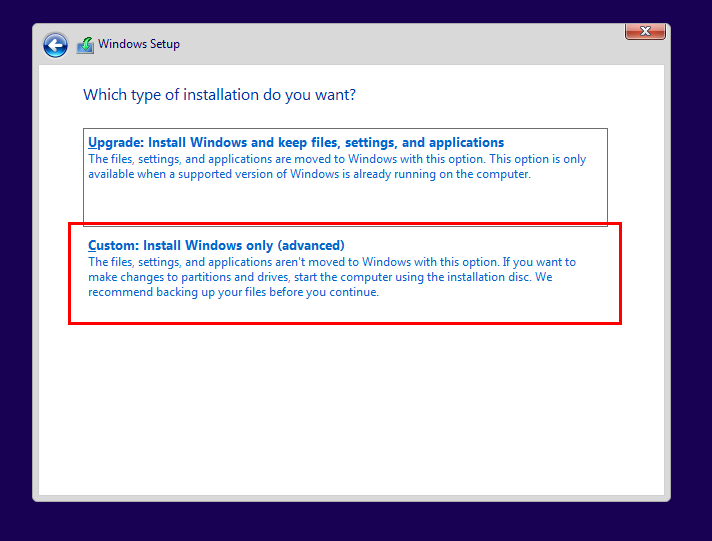
When prompted for drivers, I selected the VirtIO ISO to install the correct network and storage drivers:
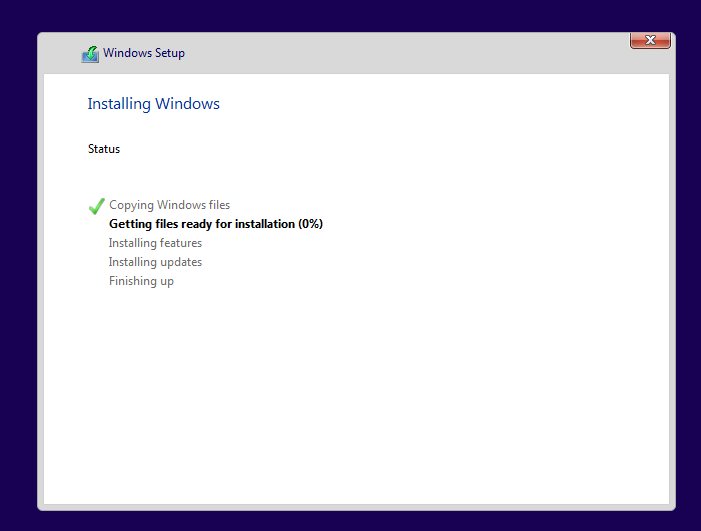
I left the Windows 10 setup at the default settings.
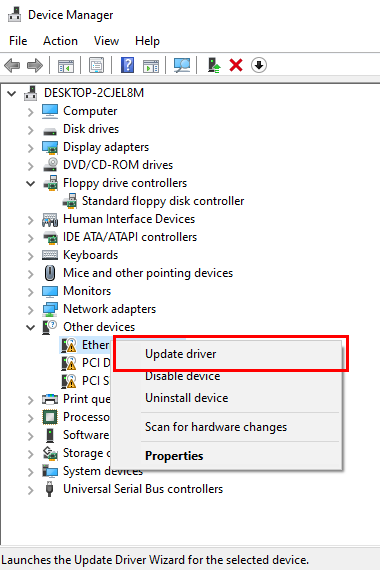
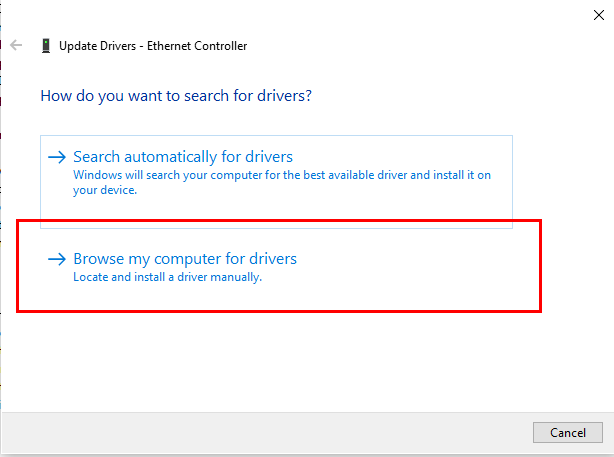
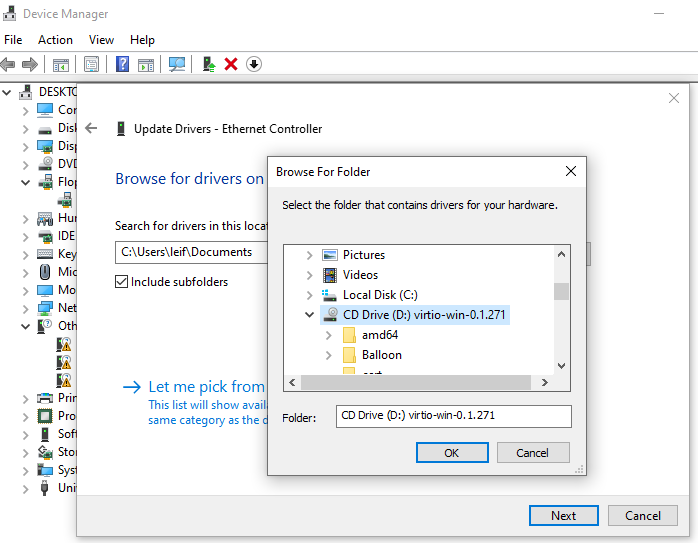
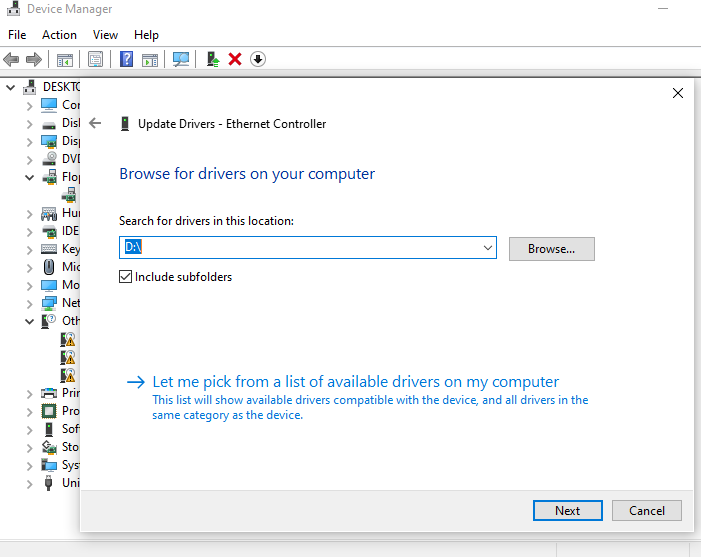
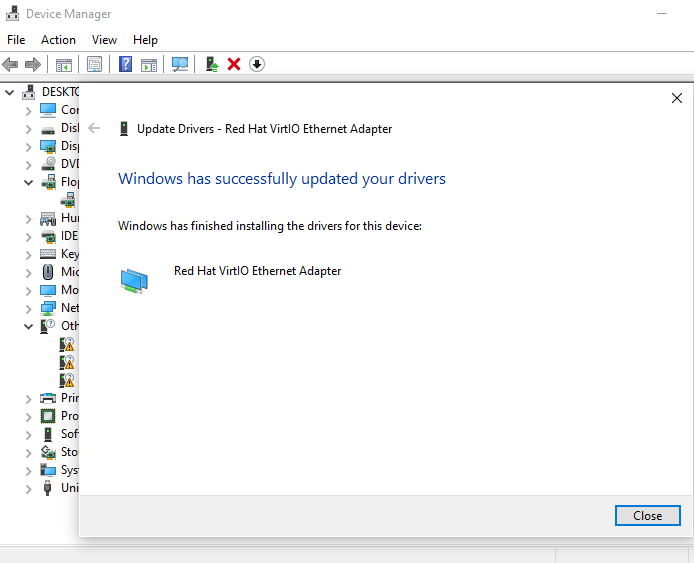
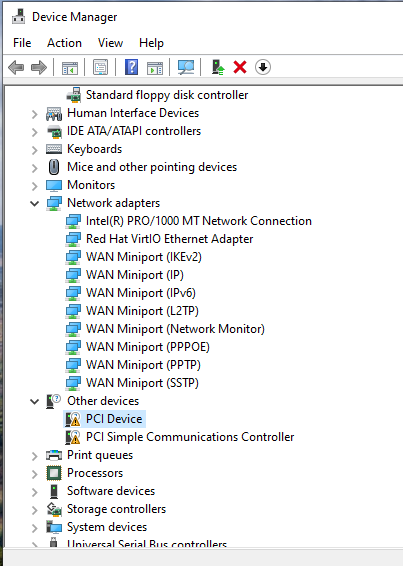
Once inside Windows, I updated all missing drivers manually in Device Manager, pointing to the VirtIO ISO:
¶ Windows Server 2022
I created a Windows Server 2022 VM in almost the same way as the Windows 10 client:
- same steps in Proxmox,
- VirtIO drivers included,
- slightly more resources assigned to handle server roles later.
¶ Other systems
I also prepared additional Linux systems at this stage:
- Kali Linux / Kali Purple
- Ubuntu Desktop
- Ubuntu Server
These I set up with default settings, since fine-tuning would come later once the network design evolved.
¶ pfSense
pfSense is an open source firewall that offers not only firewalling but also routing and general control of network traffic, as well as many other features (VPN, QoS, captive portal, VLAN management, and much more). It serves as the central point of my network, through which I will later create the various networks and operate routing and firewalling.
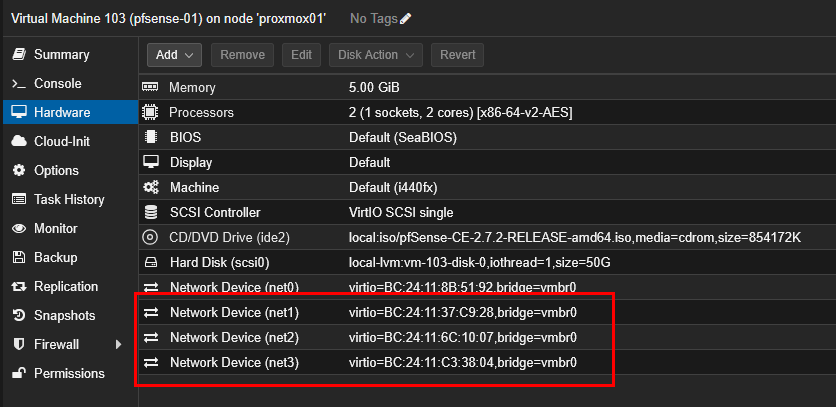
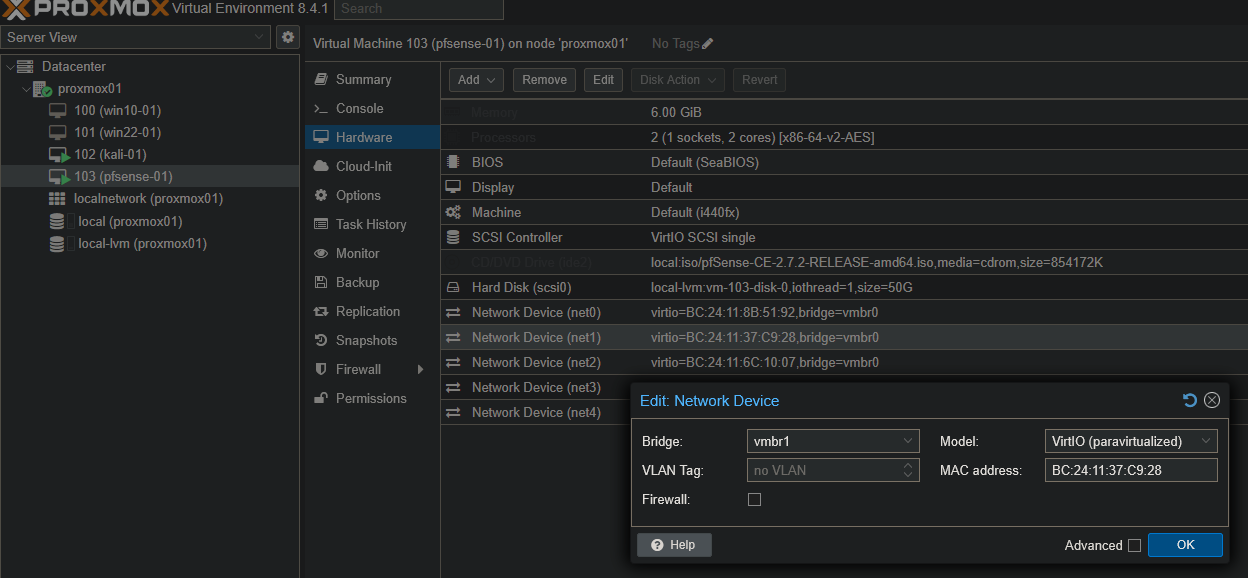
I created the pfSense VM and, before starting it, I created three additional network devices, one for each network (based on my network design):
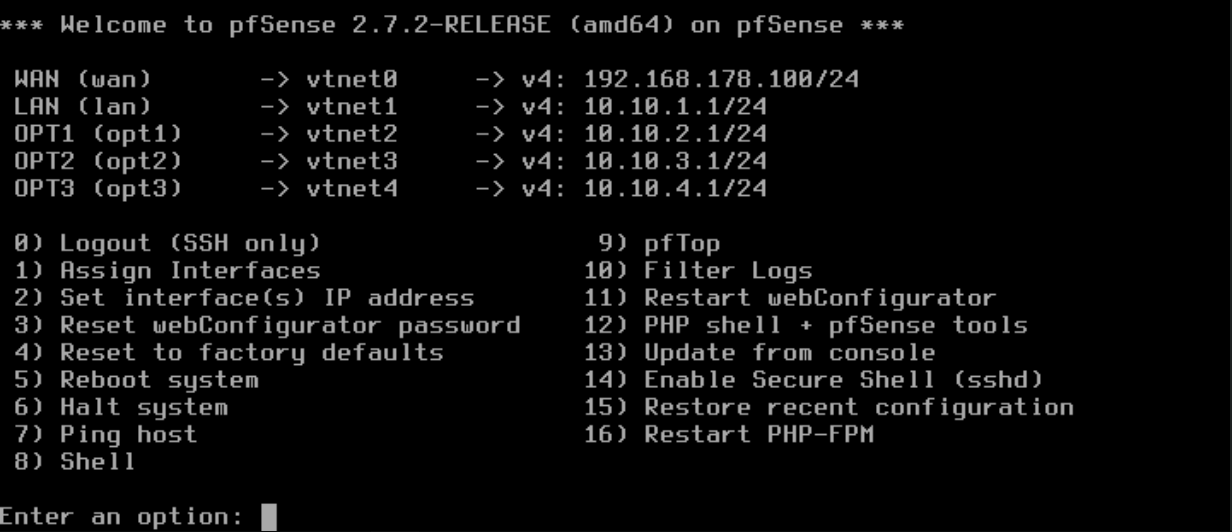
I installed pfSense with the default installer, assigned the interfaces and IPs:
- WAN → my home network (FritzBox)
- LANs → different subnets for Admin, Corp, Server, and Attack

¶ Bridges
Up to this point, all traffic in Proxmox was running over the default bridge (vmbr0). That was fine for the installation, but since I wanted proper isolation between my different LANs, I needed to create dedicated bridges for each network segment.
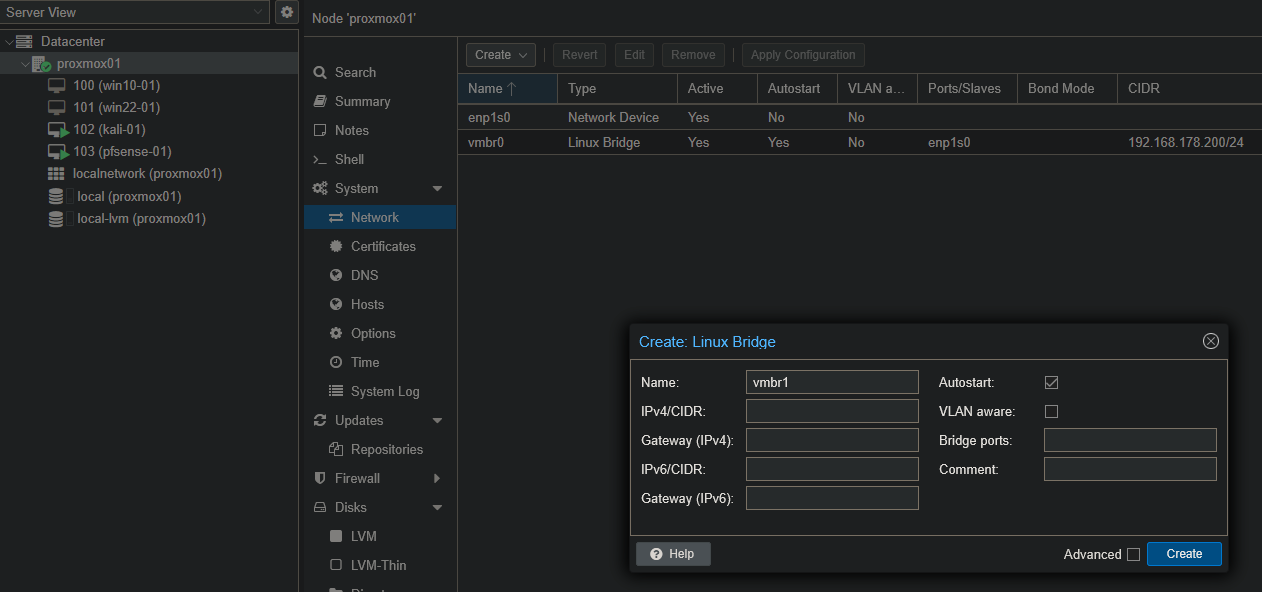
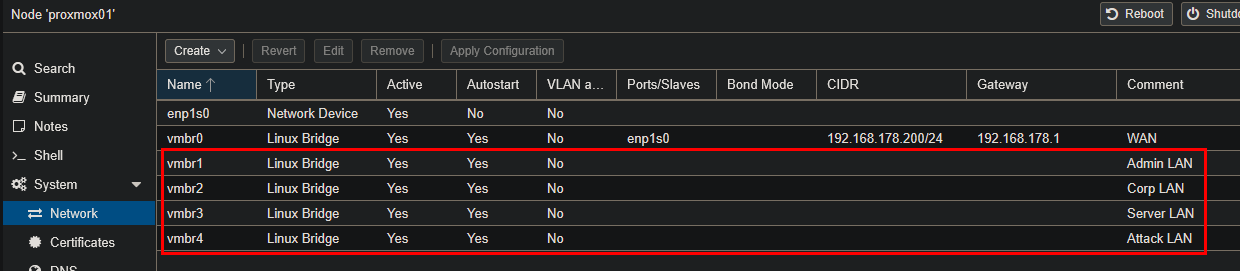
So I went to Datacenter → proxmox01 → System → Network and added new Linux bridges:
- vmbr1 → Admin LAN
- vmbr2 → Corp LAN
- vmbr3 → Server LAN
- vmbr4 → Attack LAN
This way, every network in my design had its own virtual Layer 2 switch.
After creating the bridges, I assigned the pfSense NICs to them:
I also attached the other VMs NICs to the respective bridges according to my network design (e.g. kali-01 → vmbr4 since it belongs to the Attack LAN).
At this point, pfSense was the central router with multiple network interfaces connected to the bridges, and all my VMs could be positioned in their intended LANs.
¶ 5. SPICE Setup for Desktops
Working with VMs only through the Proxmox noVNC console felt a bit limited. To make the desktop VMs easier to use, I decided to set up SPICE (Simple Protocol for Independent Computing Environments). SPICE allows me to interact with a VM almost like with a local machine, with better performance and features compared to VNC.
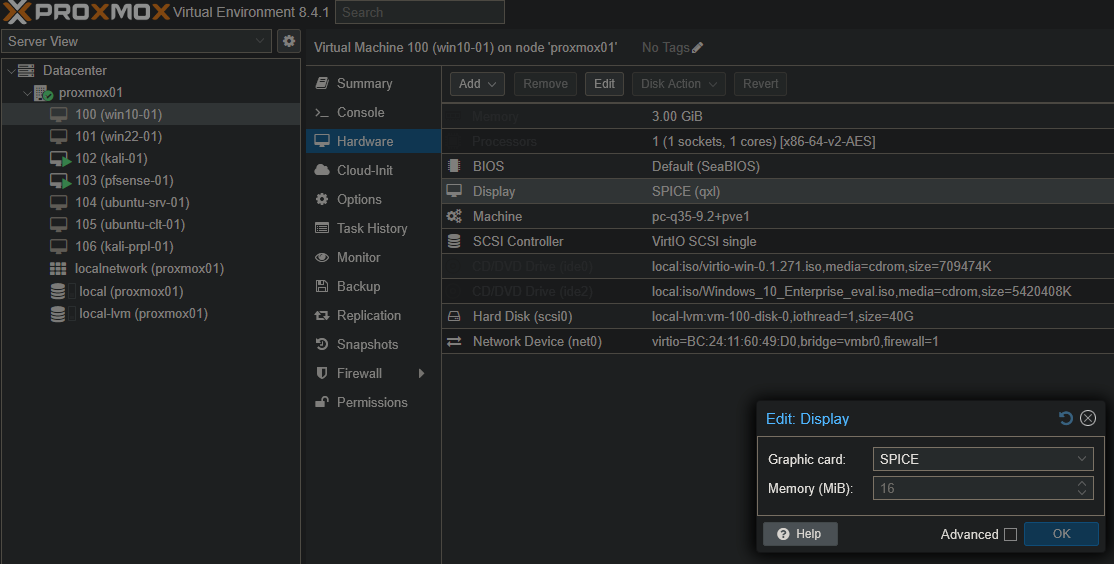
On my client PC, I downloaded and installed the SPICE client. After installation, I adjusted the Proxmox VM hardware settings:
- Under Display, I switched from Default to SPICE.
- For Memory, I set 16 MB (enough for my small lab).
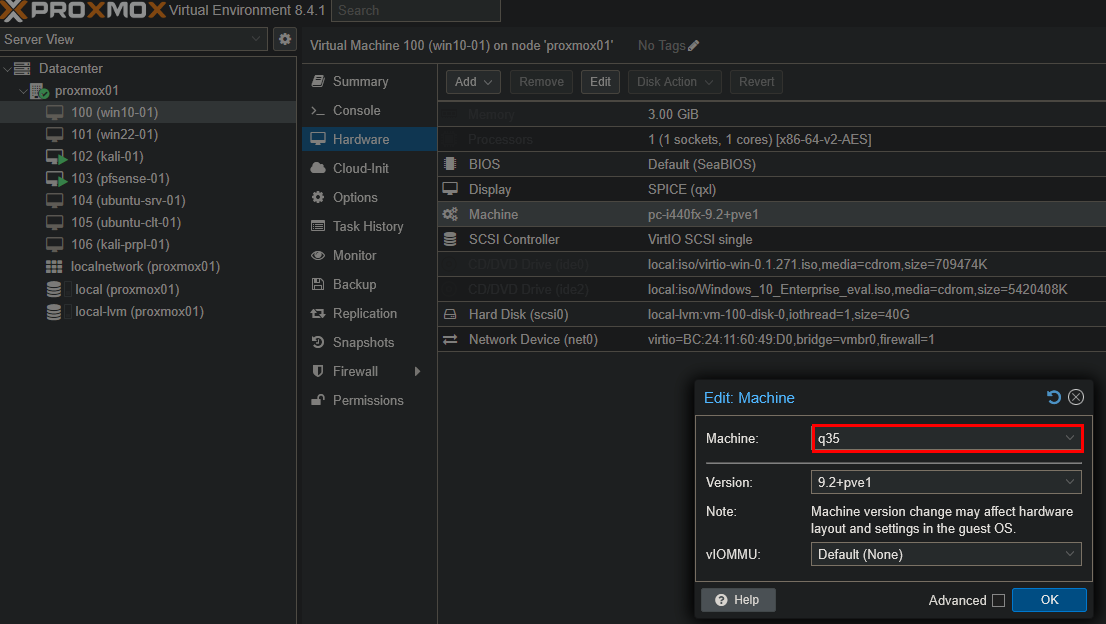
- Under Machine, I changed the default (i440fx) to q35 to improve compatibility.
Then, in the Proxmox console menu, I chose SPICE as the connection type and was able to open the VMs directly with the SPICE client:
To get everything working smoothly, I also had to install the guest tools/agents:
- On Windows VMs, I used the mounted VirtIO ISO and installed the SPICE guest tools from there.
- On Linux VMs, I installed and enabled the SPICE and Qemu agents:
sudo apt install spice-vdagent qemu-agent
sudo systemctl start spice-vdagent
sudo systemctl enable spice-vdagent
This ensured that features like clipboard sharing, automatic resolution, and improved input worked right away whenever I used the SPICE console.
¶ 6. Network Design Rework
After running the first setup for a while, I realized that my initial network design was too simple and didn’t reflect the scenarios I wanted to simulate. The attacker network wasn’t well separated, and there was no DMZ for public-facing services. For SOC-style exercises (blue vs. red), I wanted stronger segmentation and more realistic boundaries.
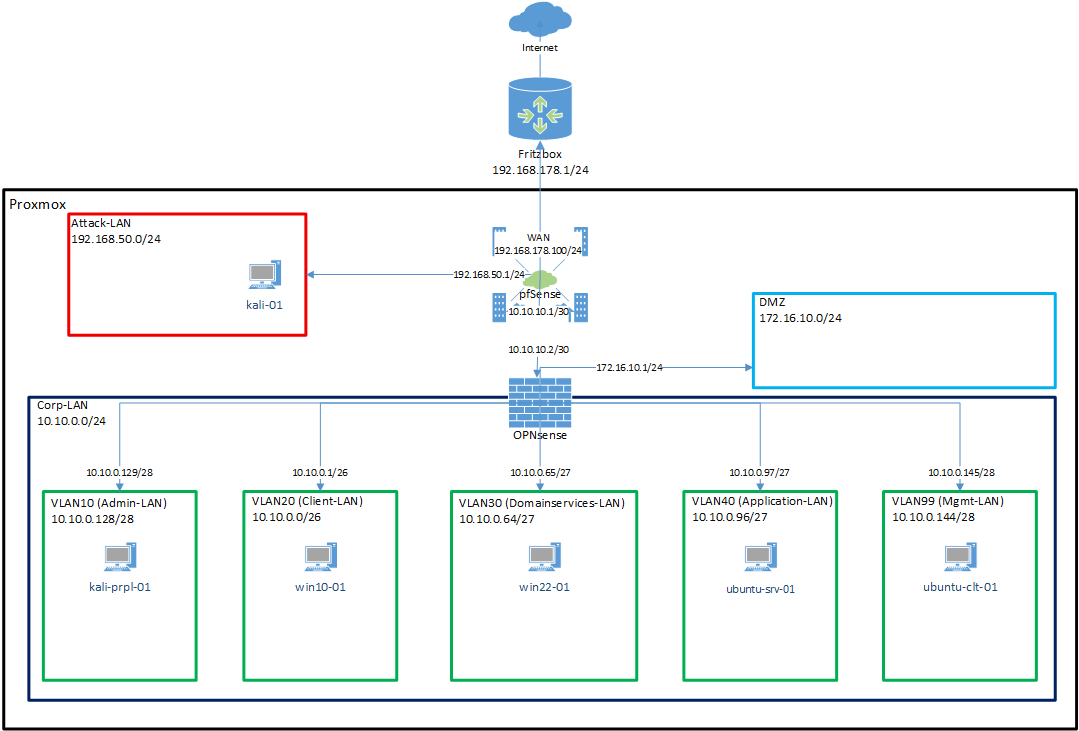
So I reworked my design and drew a new diagram:
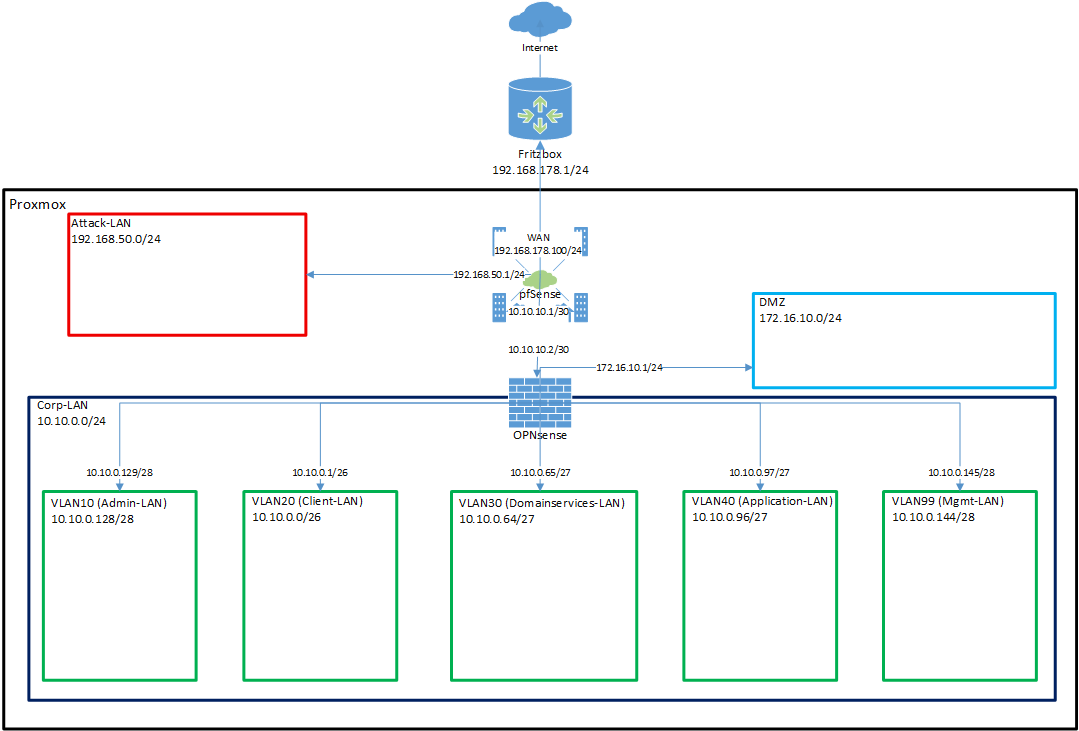
The key changes in this design were:
- pfSense remains at the edge, acting like the ISP/Internet gateway.
- OPNsense is added behind pfSense, taking over internal segmentation and VLAN management.
- Corp-LAN (10.10.0.0/24) becomes the parent network for multiple VLANs:
- VLAN10 → Admin-LAN
- VLAN20 → Client-LAN
- VLAN30 → Domain Services-LAN
- VLAN40 → Application-LAN
- VLAN99 → Management-LAN
- A new DMZ (172.16.10.0/24) is introduced for public-facing services.
- The Attack-LAN (192.168.50.0/24) remains separated and directly connected to pfSense.
This gave me a design much closer to real-world enterprise setups, with both perimeter and internal firewalls, proper VLAN segmentation, and a dedicated DMZ. It also provided me with a lot more learning opportunities: working with two different firewall solutions (pfSense vs. OPNsense), practicing VLAN configuration in a realistic way, and simulating how attackers move between zones while defenders monitor and protect the segments.
More details here: Network Design - Iteration 2
¶ 7. OPNsense Installation
I created the OPNsense VM as standard, similar to pfSense.
¶ 8. Reconfigure Proxmox and pfSense
After installing OPNsense, I had to adjust my existing setup in Proxmox and pfSense so the new design would work properly. This meant cleaning up old bridges and NICs, and aligning everything with the updated network diagram.
¶ pfSense
According to the new design, I removed the old network devices net3 and net4 from the pfSense VM. Then I reconfigured the interfaces so that pfSense only handled:
| NIC | Interface | IP | CIDR |
|---|---|---|---|
| vtnet0 | WAN (Fritz Box) | 192.168.178.100 | /24 |
| vtnet1 | LAN (P2P to the OPNSense) | 10.10.10.1 | /30 |
| vtnet2 | OPT1 (Attack LAN) | 192.168.50.1 | /24 |
- No IPv6 anywhere.
- No DHCP on the P2P LAN.
- DHCP active only on the Attack LAN (range: 192.168.50.100–200).
This way pfSense was simplified to just act as the edge router: one side to the Fritz Box, one side to OPNsense, and one side to the Attack LAN.
¶ Proxmox
In Proxmox, I cleaned up the bridges I had created earlier. I deleted vmbr1–vmbr5 and replaced them with a more structured setup:
- vmbr1 → P2P-Link (pfSense ↔ OPNsense)
- vmbr2 → Attack-LAN
- vmbr3 → Corp-LAN (for OPNsense and all VLANs)

After that, I reassigned the NICs of pfSense to the correct new bridges:

This cleaned up the old clutter and aligned everything with the new design. From here on, pfSense was only connected to the FritzBox, the P2P-Link, and the Attack-LAN, leaving the internal segmentation to OPNsense.
¶ 9. OPNsense Initial Configuration
I began by wiring OPNsense to the two relevant Proxmox bridges from my new design:
net0→ vmbr1 (P2P-Link-LAN to pfSense)net1→ vmbr3 (Corp-LAN, this will carry all VLANs)

Afterwards I rebooted OPNsense so the new NICs would be detected properly. When it came back up, the console wizard started.
The first question was about LAGGs. At that time, I didn’t know what it meant, so I looked it up: it stands for Link Aggregation, which means bundling multiple interfaces into one virtual interface to increase throughput or provide redundancy. Since I already had one dedicated virtual NIC per network segment and didn’t need higher bandwidth, I selected No.
The next prompt asked if I wanted to configure VLANs. This was exactly what I needed, so I selected Y.
- Parent interface:
vtnet1(the NIC connected to vmbr3/Corp-LAN) - VLAN tags created: 99 (Management), 10 (Admin), 20 (Client), 30 (Domain Services), 40 (Applications)
I then assigned the interfaces accordingly: WAN on the P2P link to pfSense, and LAN + the OPT interfaces as VLAN-backed networks on vtnet1.
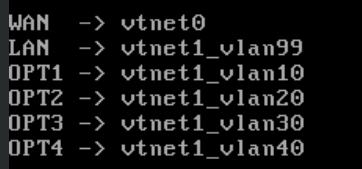
This way, all internal traffic was carried over a single tagged trunk on the Corp-LAN, while the P2P WAN stayed cleanly separated.
¶ IP Addressing, DHCP & Web GUI
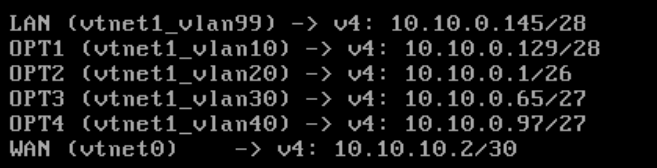
After assigning the interfaces, I configured the IP addresses for each VLAN and for the WAN side. I kept IPv6 disabled everywhere, since I wanted to keep the lab simple and fully IPv4-based for now.
- LAN (VLAN99 / Management):
10.10.0.145/28- DHCP enabled →
10.10.0.146 – 10.10.0.158 - Web GUI access restored to default so I could reach it again
- Switched Web GUI to HTTPS with a new self-signed certificate
- DHCP range always set from first to last available address
- DHCP enabled →
- OPT1 (VLAN10 / Admin):
10.10.0.129/28 - OPT2 (VLAN20 / Clients):
10.10.0.1/26 - OPT3 (VLAN30 / Domain Services):
10.10.0.65/27 - OPT4 (VLAN40 / Applications):
10.10.0.97/27 - WAN (P2P link to pfSense):
10.10.10.2/30- Upstream gateway:
10.10.10.1(pfSense) - Gateway nameserver left empty
- For now, I pointed DNS to my Pi-hole (
192.168.178.42). This would only work once routing was correct, but it gave me a placeholder.
- Upstream gateway:
To test access from the management VLAN, I also enabled VLAN aware mode on vmbr3 (the Corp-LAN bridge in Proxmox). Then I set my Ubuntu client VM (ubuntu-clt-01) to use vmbr3 with VLAN tag 99.
After booting the Ubuntu client, I pinged the OPNsense management IP (10.10.0.145) and got a response. That confirmed the setup was correct, and I could log into the web GUI via Firefox:
https://10.10.0.145
¶ Installation from Live to Disk & Config Persistence
At this point, I could log into the OPNsense web interface and configure it, but I realized I was still running in live mode. That meant all changes would be lost after a reboot. I checked the official OPNsense documentation and found that the proper way to install it permanently was via SSH. The default live system credentials are:
- User:
installer - Password:
opnsense
So I logged in over SSH with these credentials and started the installation wizard. I kept all options at default (disk layout, filesystem, etc.), since my only goal was to move the system from live mode onto the virtual disk.
Before running the installer, I downloaded the current configuration from the web interface just in case:
System → Configuration → Backups → Download configuration
That way, if the installer wiped my live-configured settings, I could easily restore them afterwards.
After the installation finished, I rebooted the VM. OPNsense now booted from disk, and my configuration was still in place.
¶ Adding the DMZ
While reviewing my setup, I noticed that I had forgotten to implement a DMZ in the new design. Since I wanted to expose some services later (e.g., for red-team vs. blue-team scenarios), I went back and added it.
In Proxmox, I created a new Linux bridge:
- vmbr4 → DMZ
Then I added another NIC to the OPNsense VM and attached it to this new bridge. Inside OPNsense, the new NIC appeared as vtnet2. I assigned it as OPT5, enabled the interface, and gave it the following settings:
- IP address:
172.16.10.1/24 - DHCPv4 enabled: range
172.16.10.100 – 172.16.10.200
This gave me a dedicated DMZ subnet, separated from both the Corp-LAN and the Attack-LAN, but still manageable from OPNsense.
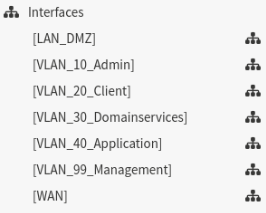
For better clarity, I also renamed the interface descriptions in OPNsense so each segment (Admin, Clients, Domain Services, Applications, Management, DMZ) was clearly labeled.
¶ Hardening
After the basic setup was complete, I started with a few hardening steps.
The first thing I did was to change the default root password to a strong one (stored in my password manager).
Next, I wanted to make sure that only the Management VLAN (VLAN99) could access sensitive services like the web GUI or SSH. So in the OPNsense web interface I went to:
- System → Settings → Administration → Web GUI
- Set Listen Interfaces to VLAN99 only
- System → Settings → Administration → Secure Shell
- Set Listen Interfaces to VLAN99 only
This ensured that the firewall itself is not reachable from client or server VLANs, but only from the dedicated management subnet.
With this, OPNsense was installed, segmented, and hardened enough to serve as the internal firewall in my lab.
¶ 10. Network Design Update
With pfSense and OPNsense both in place, I expanded the setup by adding more virtual machines to represent clients and servers in the different VLANs. I updated my network diagram to reflect these changes:
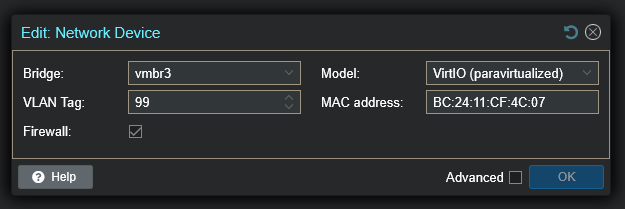
Then I configured the VMs in Proxmox by assigning them to the correct bridges and VLAN tags. This way, each VM landed in the proper subnet behind OPNsense.
| VM | Bridge | VLAN Tag |
|---|---|---|
| kali-prpl-01 | vmbr3 (Corp-LAN) | 10 |
| win10-01 | vmbr3 (Corp-LAN) | 20 |
| win22-01 | vmbr3 (Corp-LAN) | 30 |
| ubuntu-srv-01 | vmbr3 (Corp-LAN) | 40 |
| ubuntu-clt-01 | vmbr3 (Corp-LAN) | 99 |
| kali-01 | vmbr2 (Attack-LAN) | - |
With this, I had a more complete environment:
- one machine in each VLAN,
- a dedicated management client,
- an attacker machine directly connected to the Attack-LAN,
- and a clear separation between internal and external zones.
¶ 11. pfSense config
My goal for pfSense was to make it act as the “invisible ISP” for the lab. For the internal networks it should look like the Internet, just doing routing and NAT between the Fritz Box, OPNsense, and the Attack-LAN.
To reach the pfSense web interface for configuration, I temporarily changed the P2P link subnet from /30 to /29. This gave me one extra usable IP, which I assigned to my Ubuntu client so I could access pfSense via browser. After the setup was complete, I switched it back to /30.
¶ System
System -> General Setup
- Hostname:
pfsense-01 - Domain:
home.arpa(left default)
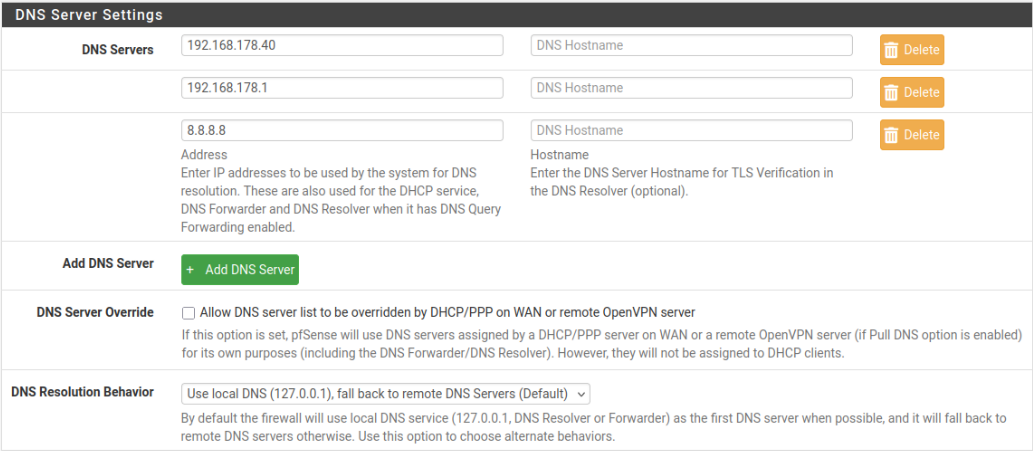
¶ DNS Server Settings
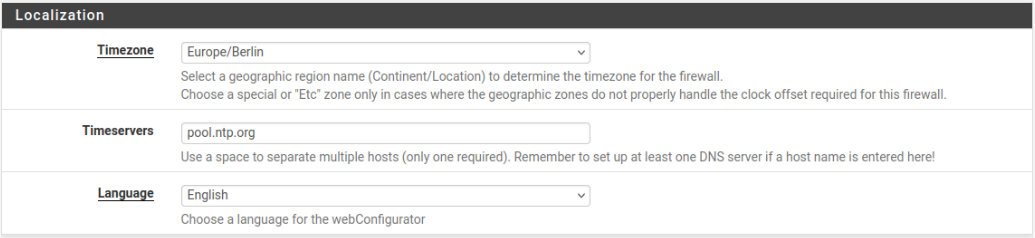
¶ Localization
¶ Admin Access
Under System → Advanced → Admin Access I enforced HTTPS only for the Web GUI.
¶ Firmware Update
Right after logging in I saw that an update (2.8.0) was available. I installed it immediately so the system was up to date.
¶ Security
- SSH Access: Disabled completely.
- Web GUI: Restricted to the management IP only.
- Password: Changed the default admin password and stored it in my password manager.
¶ Interfaces
pfSense now only had to handle three interfaces:
- WAN → Fritz Box
- LAN → P2P to OPNsense
- OPT1 → Attack-LAN
Everything else (Corp-LAN, VLANs, DMZ) was delegated to OPNsense.
With this, pfSense was configured as the edge router/NAT gateway and stayed mostly out of the way of the internal networks.
¶ 12. Finish
With this, the initial setup of my home lab was complete:
- Proxmox was installed as the hypervisor and prepared with bridges.
- pfSense was configured as the edge router and NAT gateway, connecting my lab to the FritzBox/Internet and handling the Attack-LAN.
- OPNsense was installed and set up as the internal firewall, managing VLANs, DHCP, and the DMZ.
- Multiple VMs (Windows, Linux, Kali) were created and placed into the correct VLANs, ready to act as clients, servers, or attacker machines.
This provided me with a realistic, segmented environment to build on.
From here, the next steps will be:
- configuring Windows Server as a domain controller,
- adding applications and internal services,
- fine-tuning firewall rules and monitoring,
- and finally starting with SOC-style simulations and blue/red team exercises.
The base is in place, now the fun part of configuring, hardening, and experimenting begins.
¶ 13. Lessons Learned
Looking back at the initial setup process, there were several key takeaways that stood out:
- Start simple, refine later: My first network draft was intentionally minimal. It was easier to add VLANs, a DMZ, and an extra firewall later than to untangle an over-engineered setup from the start.
- pfSense vs. OPNsense: Running both firewalls in parallel gave me the chance to compare two different open-source solutions and understand their strengths in practice.
- Proxmox bridges matter: Taking the time to properly separate traffic on Layer 2 with dedicated bridges made the design much cleaner and easier to manage.
- LAGG research: I initially didn’t know what link aggregation was. After checking, I realized it wasn’t needed for my use case, but now I know how and when it would be useful.
- VLANs bring flexibility: Trunking all internal segments over one NIC (with VLAN tags) provided realistic segmentation and saved virtual NICs.
- Persistence check: OPNsense running in live mode would have wiped my config. Backing up before disk installation was a lifesaver.
- Management isolation: Restricting GUI and SSH access to the Management VLAN was a critical hardening step that aligned with best practices.
Overall, this first iteration of my lab gave me not only a working environment but also a clear picture of how to build, document, and improve network infrastructure step by step.